Monday, September 30, 2013

Round and Round the Blogs

I posted my photos from Quilts in the Barn but I didn't add much description.  If you want to see some more quilts from the exhibition take a peek at these blogs (hello Carole, Miriam and Sue-Anne!)


And, speaking of blogs, I found a few more bloggers sharing their Chester Criswell Quilt blocks.
 

Marian Edwards Dreamweaver has put up a photo of her first three blocks.  There are so many red prints, you don't often see the same design twice.


And here is Chris's Quilting at the Farm, a new blogger but obviously a very experienced quilter.  Isn't that red print gorgeous!  Chris has started with Block #13 and it's looking great.

Block #14 is getting put together, it's running a little late but it should be sent out tomorrow.


Friday, September 27, 2013

A Day at The Barn

After yesterday's storms, wind and rain it was fantastic to have perfect weather to visit Quilts in the Barn at Wonga Park.  The theme this year was "All About Chintz".

The quilts, old and new, were remarkable.


 It was a great opportunity to rendezvous with friends....

Miriam, Sharon and Carole
The Blogging Triumvirate

... and a chance to add some variety to the stash.


Friday, September 13, 2013

New Purchases

I picked up these two prints from the Friendship Collections for a Cause by Moda.  The range was based on a 1850's signature or friendship quilt.


I think the red will do nicely for this block.


And the cream print was too pretty to leave behind.

I bought a new book too.


I was hoping to go to the exhibition at the Queensland Art Gallery : Quilts 1700 - 1945 from the Victoria and Albert Museum.  I didn't make the trip so I bought the book instead.  Actually, I bought the original London catalogue book because the Australian one is sold out.  It's brilliant, lots of pictures and lots of history.  


I missed out on Queensland, but I am going to Quilts in the Barn at Wonga Park.  I will be going on Friday, I'd love to say hello if you are going too.

Wednesday, September 4, 2013

Alice Criswell's Big Block

How do you like the first block of The Second Year?

Alice and Andrew Criswell's block

I think it has a Hawaiian feel about it.  This block isn't more difficult than the previous blocks, the challenge is in the preparation.  

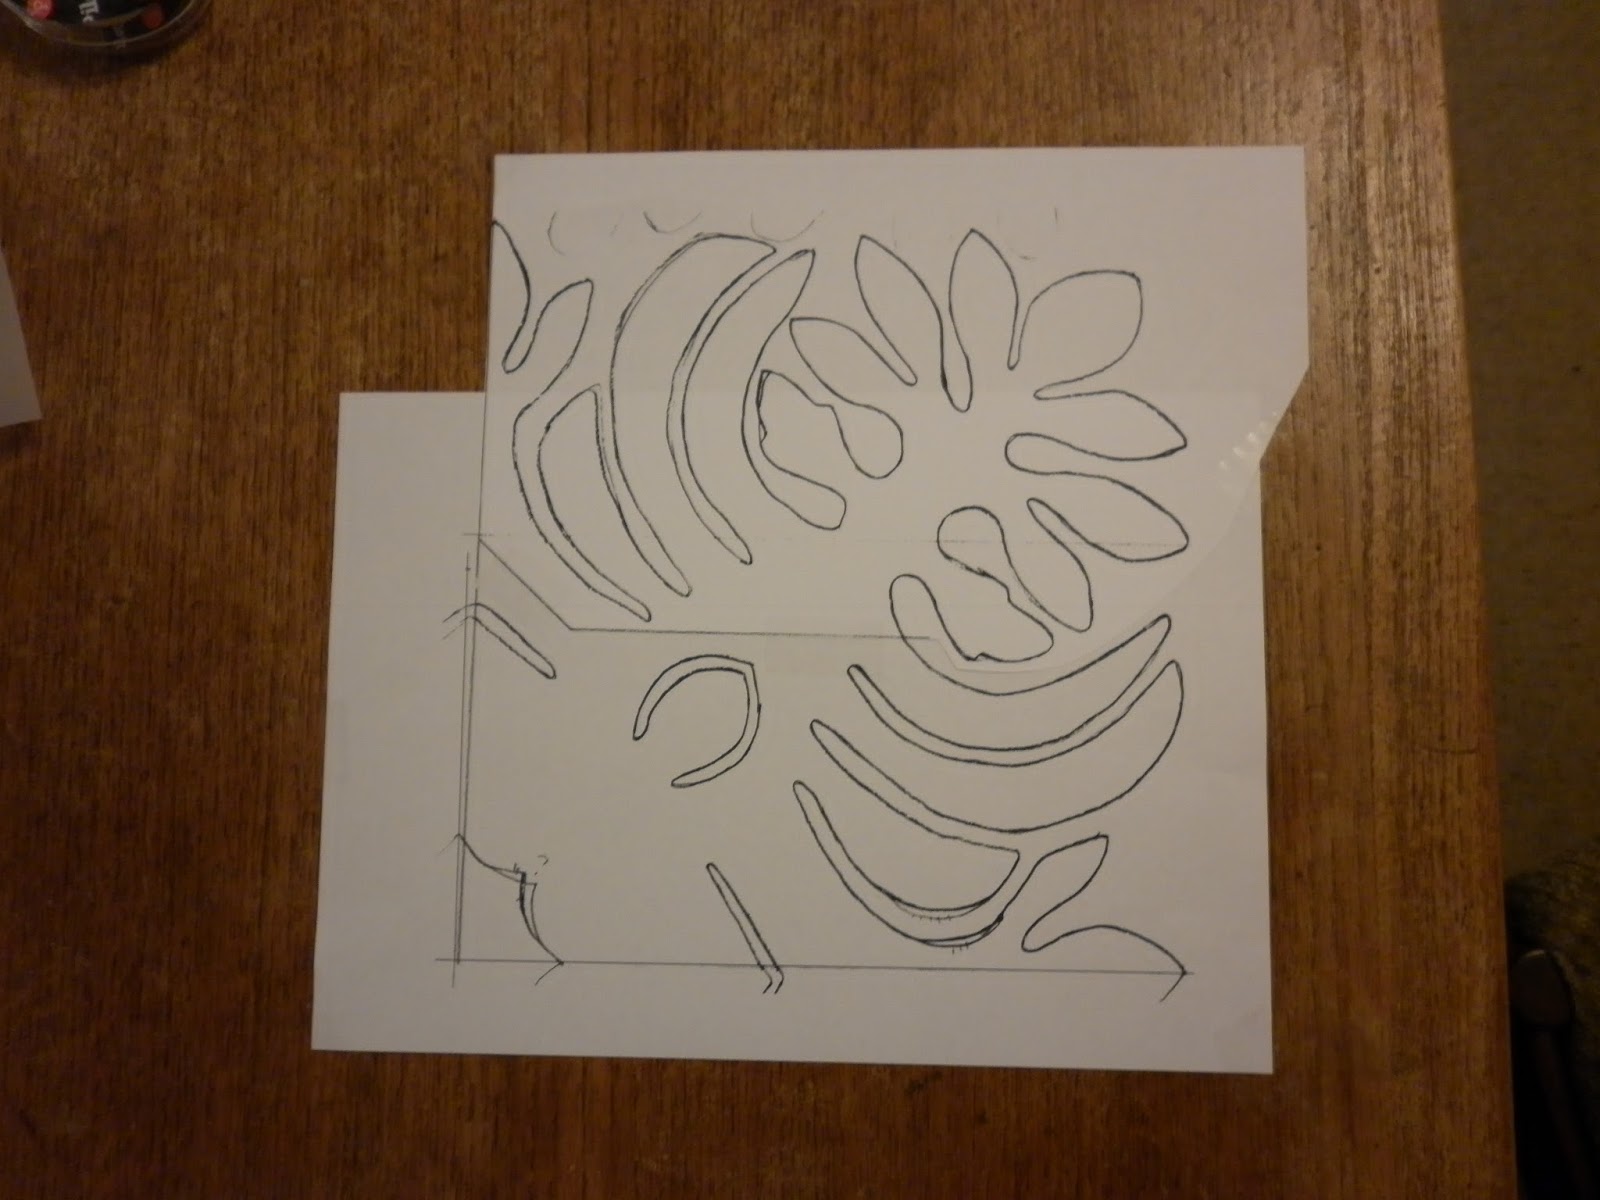
I started by taping the two pattern pieces together to make one quarter.  This is my first draft of the pattern, it hasn't been prettied up yet.  I've taped it to the table so it doesn't shift.


I found a large piece of light interfacing, big enough for the whole pattern.  I taped the interfacing over the pattern and traced one quarter.  Then I turned the interfacing over and traced the next quarter on the opposite side of the interfacing.  That gave me a mirror image and I could see the first drawing through the sheer material.  I did the same for the next two quarters and the pattern was finished.  


Cutting it out took time, I had to be careful not to tear the interfacing.  When finished I basted the interfacing to the fabric.  The interfacing stayed on while I did the needleturn, it was easy to fold out of the way to see my stitches.


I found that this method worked well for me.  If you have a clever way to prepare a big applique we'd love you to share it.

Friday, August 30, 2013

Ready for Another Year?

One year ago today I visited Quilts in the Barn for the first time.  Linda and Bev had invited me to bring and share the CCCQ with some like-minded friends. The year that followed has been awesome!


These blocks belong to Nancy from Tattered Garden Quilting.  Nancy can't stop at just one, she has made two of almost every block.  She made one for me too.


So, what's new for the second year? The Second Year is what's new.  There are eleven more patterns to be released once a month, and the first one will be ready .....  Now!

You can get just Block 13, Alice Criswell's block, or you can sign up for the whole Second Year.  Or you can visit Two Bits Patches on Facebook.  Or you can leave a comment below.  Enjoy the journey!

Thursday, August 22, 2013

Quilts in the Barn


Are you going to Quilts in the Barn?  I haven't been before but I am going to go this time.  Linda Collins very generously opens her home and studio and hosts a wonderful quilt show.  Last year the theme was red and white quilts; this year it is All About Chintz.  You can read more at Linda's blog.

You might win the raffle quilt....


Wednesday, August 7, 2013

Photos of Martha Lambourn's Block 12

Did you enjoy Martha Lamborn's block?  I found it challenging myself but I was very pleased when I finished it.

Block 12 Martha Lambourn

This block was one of the blocks in the original quilt that had me convinced I could never be clever enough to make this quilt.  How glad I am that I was wrong!

On Facebook today I came across a post by James Clear.  James was writing about Richard Branson's successful lifestyle.  This quote stood out for me.
If you want to summarize the habits of successful people into one phrase, it’s this: successful people start before they feel ready. Branson has started so many businesses, ventures, charities, and expeditions that it’s simply not possible for him to have felt prepared, qualified, and ready to start all of them. In fact, it’s unlikely that he was qualified or prepared to start any of them. 
 If you’re working on something important, then you’ll never feel ready. A side effect of doing challenging work is that you’re pulled by excitement and pushed by confusion at the same time. If you’re working on something important, then you’ll never feel ready. A side effect of doing challenging work is that you’re pulled by excitement and pushed by confusion at the same time.You’re bound to feel uncertain, unprepared, and unqualified. But let me assure you of this: what you have right now is enough. You can plan, delay, and revise all you want, but trust me, what you have now is enough to start. It doesn't matter if you're trying to start a business, lose weight, write a book, or achieve any number of goals... who you are, what you have, and what you know right now is good enough to get going. We all start in the same place: no money, no resources, no contacts, no experience. The difference is that some people — the winners — choose to start anyway.
1. Write your blog post. Publish it on your blog.
2. Copy the link of the specific blog post. This is not just the link to your blog itself (www.chestercriswellquilt.blogspot.com), but the link to the specific post: (http://chestercriswellquilt.blogspot.com.au/2012/08/hows-it-going.html)
3. Click the blue link up button below and paste your link into the box.

Thursday, August 1, 2013

The Wow Factor

I received this lovely photo from Zoë in British Columbia, Canada.  She's completed all The First Year blocks.


Zoë has stuck to the red and green 1850s colour scheme but has chosen from a wide variety of values and prints.  I noticed something interesting in the top left hand corner and asked Zoë about it. It's a little drawing of her house.


Yes, it's a picture done in brown ink.  I have enough trouble just signing my name in a block - how special is it to create an inked sketch? I feel very privileged to find that my patterns have become a starting place for some beautifully creative work. 

A number of people have completed the first twelve blocks.  If you send me a photo I will put it in the next blog post. 
And  if you are waiting for the Second Year check your email inbox next week. Details of the next exciting installment will be soon revealed ....


Friday, July 26, 2013

A Swap and a New Look at Block 2

I received a swap blog from Miriam a few weeks ago.  We decided to exchange the fleur de lis Block 10 after Miriam's delightful guest blog. I wrote my signature freehand for the first time, no tracing.


 Miriam signed her block but she had the naughty pen.  She wasn't pleased with the result so she cut the centre out and replaced it with a new signature.


Miriam isn't the only one to have troubles.  Have a look at this block from the original quilt.

Did Emily Carlile have to cover a mistake, or was she just being cautious?  It is tempting to peek under the fabric.

Barbara Burnham has an interesting post on signing quilts on her blog Baltimore Garden Quilts. Her blog has lots of helpful ideas and eye-candy photos.

I've been making another block from the quilt, this one one made by Lydia Baker.  The pattern outline is the same as Elizabeth Cowan's but the green leaf has been cut differently.

Lydia Baker pattern

detail of Lydia Baker's block


Elizabeth Cowan pattern

Tuesday, July 16, 2013

Godey's Lady's Book April 1850


The Work Table - Patchwork 
Many improvements may be made in the old style of patchwork that we have been accustomed to see, and, in anticipation of some improvement in the designs at present used, we venture to intrude a few remarks, trusting that our “Family Friends” will not take them amiss.

The materials necessary for patchwork are such portions of wearing apparel, whether of cloth, calico, linen, Holland, silk, velvet, cotton prints, &c., as would otherwise be thrown away, or saved for the rag-man.  The next necessary article is some stiff paper, to form the shapes; and lastly, the design-shapes, cut out in tin, and the designs themselves.  The materials should be arranged into shade and qualities.  After having been cut to the requisite sizes, and the irregularities of the edges neatly remedied, they are ready for use.

The patterns may be varied ad infinitum, if the person possess the least talent for drawing and designing; but, for the sake of those who may not be thus gifted, we submit the accompanying simple and effective design, to be executed in any of the materials.

To make the Patchwork.- The pattern should be placed before the person, and, the shades being selected, the several pieces arranged so as to form the design, and the edges then neatly sewn together; after which, they are either pressed or ironed, the papers removed, and the lining proceeded with.

When silks and velvets are employed, it improves the effect to combine the two, taking the silk for the lighter, and the velvet for the darker shades; or, as in figs. 5, 6, 8, and 11, to have silk for the lighter shades, and two velvets for the others, shaded to pattern.

A very pretty effect is produced by combining Holland and calico, silk and satin, silk or satin and velvet, and rough and fine cloth.

The various articles that may be manufactured, are quilts in colored and white calico;  anti-mecassars in silks; ottomans in silks and velvets, or in silks and cloth; cushions for chairs or sofas, in silks; and mats, rugs, and carpets, in cloth.

We have seen many useful white quilts for children’s cots made from the cuttings remaining after shirt-making.  The centre might be of Holland and calico, pattern 10, fig. 5, and the fig. 7, with a fringe border, knitted.  Numerous rugs might be made in colored cloths to look equal to carpets, and wear much better.


Thursday, July 11, 2013

The Year in Review

*** The new website for www.twobitspatches.com is looking great!  We are open and ready for visitors, hope you like the new format.


If you have been making one block each month you might have something like this.


These blocks are my First Year blocks.  They are just a photoshopped quilt at the moment, but I have begun my quilt-as-you-go and two of the blocks are joined together in the reality world.

My final quilt will be 6 by 6 blocks, and the layout will be something like the picture below.  I'm using EQ7, it is much more useful than EQ5.  The wreath block isn't quite in the right spot, the centre square will take up four positions.  Which I'm sure you can do in EQ7, I just need to keep reading the manual.


The original Chester Criswell quilt is bigger, it's an 8 by 8.  The blocks are repeated two or three times, and the layout looks a little like the picture here.


In one of the many online applique groups, a member asked if the Chester Criswell quilt was suitable for a beginner.  The suggestions have been interesting, what would you say?

Tuesday, July 2, 2013

Block 12 and a Guest Visitor

I asked Carole from Wheels on the Warrandyte Bus to be a guest blogger and she has been waiting patiently for the block she chose to be revealed.  You need to check out her blog too, Carole's fabric choices are excellent and she has a lot of Work in Progress to show.  Thank you Carole!


I was very flattered to be asked by Sharon to be a guest blogger for the Chester County Criswell quilt. She gave me a few different blocks to choose from and I picked the wreath block. 


Firstly I thought about which fabrics to use, I am making this quilt in blue and green rather than the original red and green. I like to have some similarity within the block and so I chose these two because they both had curvy bits in the pattern, echoing the curve of the wreath.


I wanted my wreath to be a perfect circle so I used a plate to round off Sharon's pattern.


I made the circular stem with bias using a 'Clover' tool. I have the fabric widths written in the box lid for my own reference (after throwing away the packaging long ago).


For the 1/4" bias I cut strips 3/4” on a 45° angle so that the fabric would curve smoothly. I fussy cut the fabric to incorporate the swirls.


I used the bias tool with a strip of visoflex, pinning it to the ironing board when you commence keeps everything together. I used 4 bias strips for the wreath circle.


The right side of the wreath is the same as the left but upside down so I printed out two copies of the pattern and stuck them together for a complete circle, then I pinned down the flowers and leaves. I didn't need to have the flowers on yet (as they go over the stem) and in hindsight I shouldn't have put them on yet as they became quite frayed and I actually lost one on of my bus journeys.


 I needle-turned the leaves and pomegranates first, then the stem and then the flowers. I sewed the inner curve of the stem before sewing the outer curve.  The flowers and pomegranates require some reverse applique so I placed yellow fabric underneath for the flowers and red for the pomegranates.


The picture below shows the reverse applique that's required for the pomegranates and flower centres. I forgot to cut some slits before sewing these down so I used a good quality seam ripper to cut into these parts.
Lastly I embroidered the pomegranate tendrils with a simple running stitch using 2 strands of DMC. When you are marking out the tendrils be careful of keeping them within the finished 12” block size, particularly if you round off the pattern as I did.


The finished wreath block.